A free roof inspection helps you find roof damage, leaks, weak areas, and signs of aging before they become expensive problems. During the visit, a roofing professional checks the main parts of your roof and explains whether you need repair, maintenance, or replacement.
For homeowners in Maryland and Virginia, this is especially useful because roofs deal with heavy rain, wind, hail, humidity, snow, and seasonal storms. Some roof problems are easy to see, but others stay hidden until water starts leaking inside the home.
A proper inspection gives you clear information, not guesswork. It helps you understand the real condition of your roof and what steps make sense next.
What Is a Free Roof Inspection?
A free roof inspection is a no-upfront-cost roof assessment performed by a professional roofing contractor. The roofer checks the visible parts of your roofing system for damage, wear, leaks, poor drainage, ventilation issues, or storm-related problems.
The inspection helps determine whether your roof is in good condition, needs a small repair, or may require replacement. A reliable roofing contractor should explain the findings in simple terms, show photos when possible, and recommend practical next steps.
Why Homeowners Schedule a Free Roof Inspection
Many homeowners schedule a roof inspection only after they notice a problem. This may include a ceiling stain, missing shingles, a roof leak after heavy rain, or damage after a storm. But waiting until water enters your home can make the repair more expensive.
A free roof inspection is also helpful if your roof is older, your shingles look worn, or you are preparing to sell your home. In Maryland and Virginia, regular inspections are especially useful because weather conditions can be rough on roofing materials throughout the year.
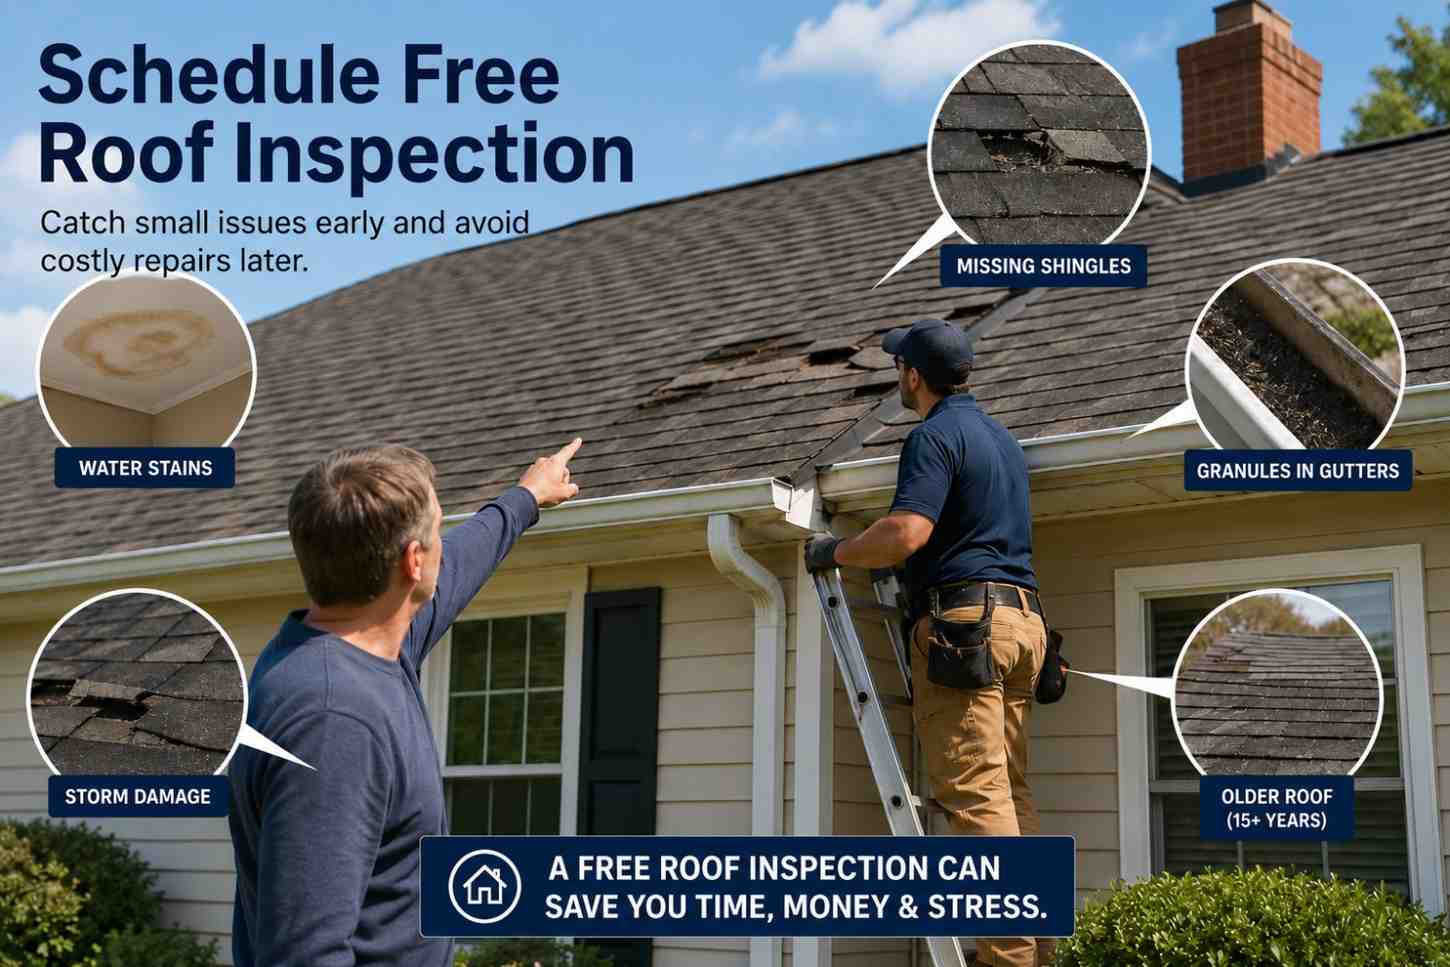
You should consider scheduling a roof inspection if you notice:
- Water stains on ceilings or walls
- Missing, lifted, or curled shingles
- Granules collecting in gutters
- Leaks after heavy rain
- Loose flashing around chimneys or vents
- Sagging or soft-looking roof areas
- Recent wind, hail, or storm damage
- A roof that is 15 years old or older
Even if everything looks normal from the ground, a professional roof damage inspection can reveal issues that are not easy to see.
What Happens During a Free Roof Inspection?
A professional roofer follows a step-by-step process to understand the full condition of your roof. The exact inspection may depend on your roof’s size, age, slope, weather conditions, and safety concerns. However, most residential roof inspections include the same main areas.
1. The Roofer Starts With a Basic Assessment
Before inspecting the roof, the roofer usually asks about leaks, stains, storm damage, roof age, and past repairs. This helps them understand where to focus during the inspection.
This step is important because roof leaks can be tricky. Water may enter from one area and show up somewhere else inside the home.
2. Exterior Roof Inspection
The exterior roof inspection helps the roofer identify visible damage, aging, and weak areas on the roof surface. They may check for missing or cracked shingles, lifted shingles, exposed nails, damaged vents, loose ridge caps, soft spots, and signs of poor installation.
If it is safe, the roofer may walk on the roof. If the roof is steep, wet, icy, or unsafe, they may inspect it from a ladder or use other safe methods. This step helps show whether the roof has minor damage or deeper issues that need attention.
3. Shingle Condition Check
Shingles protect your home from rain, wind, sunlight, and moisture. During a free roof inspection, the roofer checks for cracked, curled, lifted, or missing shingles, along with nail pops and granule loss.
Granule loss is especially important because it shows the shingles may be wearing down. In Maryland and Virginia, where roofs face heat, humidity, rain, wind, and winter weather, a shingle roof inspection helps determine whether a simple repair is enough or if larger roof work may be needed.
4. Flashing and Leak-Prone Areas
Flashing is the metal material installed around areas where the roof meets another surface. These areas are some of the most common places for leaks to start.
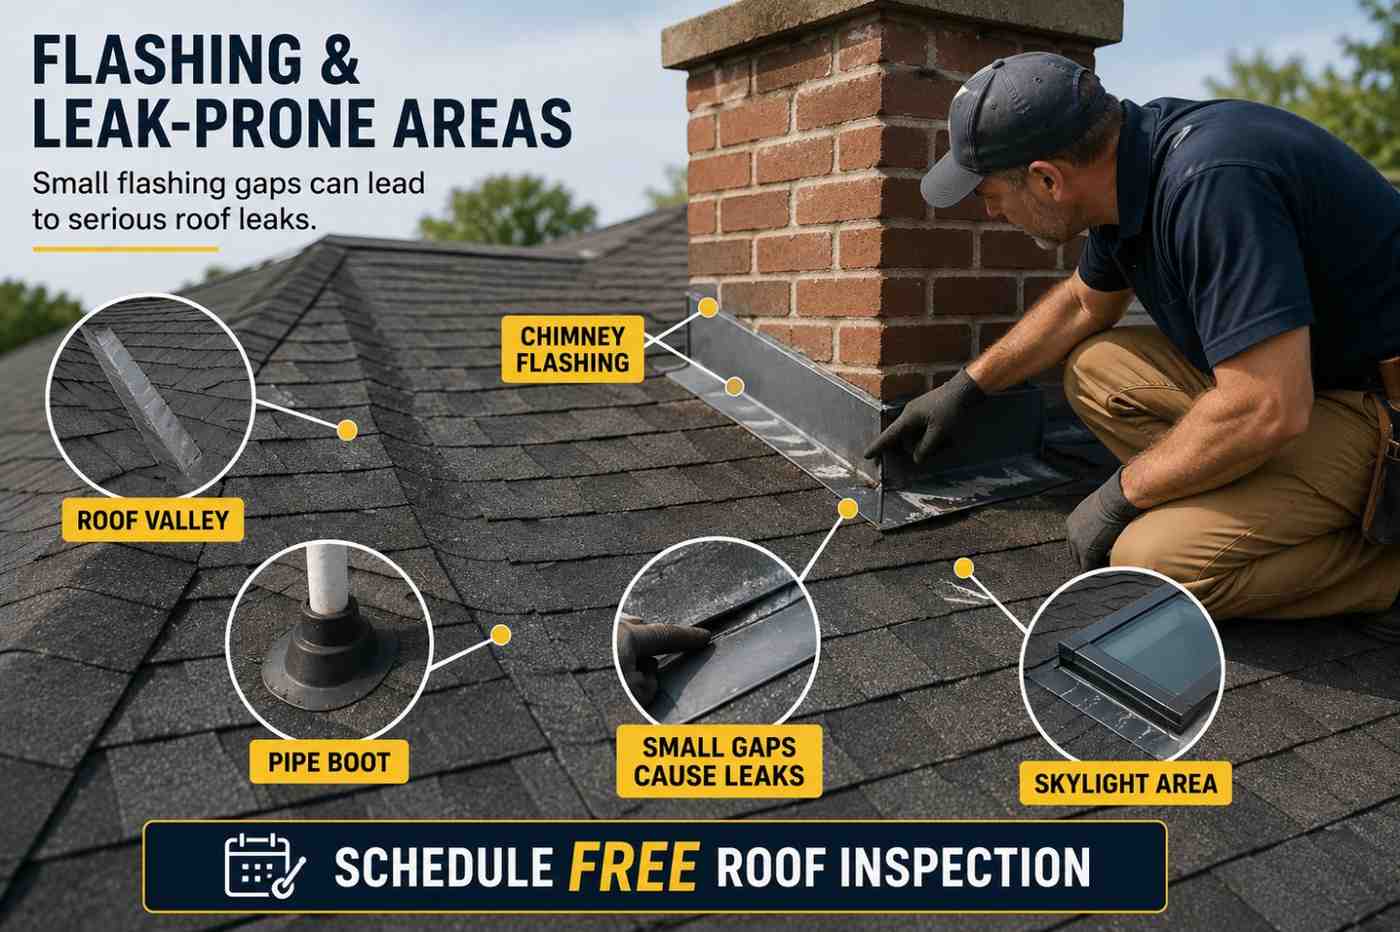
A roofer usually checks flashing around:
- Chimneys
- Skylights
- Roof valleys
- Vents
- Dormers
- Walls
- Pipe boots
Even a small gap in flashing can allow water to enter the home. Over time, flashing can loosen, rust, crack, or pull away from the roof surface. Poorly installed flashing can also create leaks, even if the shingles are still in decent condition.
This is why flashing is a major part of any roof leak inspection. A good roofer does not only look at the shingles. They check all the areas where water is most likely to enter.
5. Gutter and Drainage Inspection
Gutters help move water away from the roof. If they are clogged, loose, or damaged, water can back up under the shingles or collect near the roof edge.
During the inspection, the roofer may check for clogs, damaged downspouts, overflow marks, loose sections, and shingle granules in the gutters. Good drainage helps protect the roof, fascia, siding, and foundation from water damage.
Roof Inspection Checklist
| Inspection Area | What the Roofer Looks For | Why It Matters |
|---|---|---|
| Shingles | Missing, cracked, curled, lifted, or loose shingles | Shows roof wear, wind damage, or aging |
| Flashing | Gaps, rust, cracks, loose metal, poor sealing | Common source of roof leaks |
| Gutters | Clogs, granules, poor drainage, loose sections | Helps water move away from the roof |
| Roof Vents | Cracked seals, damaged boots, loose vents | Prevents leaks around roof openings |
| Attic | Water stains, wet insulation, poor ventilation | Reveals hidden leaks or moisture issues |
| Roof Deck | Soft spots, sagging, uneven areas | May show deeper structural damage |
6. Attic Inspection
An attic inspection may be included if there are signs of leaks, moisture, or poor ventilation. Even when the roof looks fine from the outside, the attic can reveal hidden problems such as water stains, wet insulation, rusted nails, mold-like growth, soft wood, or poor airflow.
This step is especially important in humid areas like Maryland and Virginia. Trapped heat and moisture can damage the roof deck and shorten the life of the shingles, so checking the attic helps the roofer understand the full condition of the roofing system.
7. Storm Damage Roof Inspection
Storm damage is a common reason homeowners request a free roof inspection. Wind, hail, heavy rain, and falling branches can damage shingles, flashing, vents, gutters, and roof edges.
During the inspection, the roofer checks for lifted shingles, broken seals, hail marks, impact damage, loose ridge caps, exposed nails, and damaged vents. If damage is found, photos may be taken to help you understand the issue and support an insurance claim if needed.
8. Roof Leak Inspection
A roof leak inspection focuses on finding the actual entry point of water. This is not always simple because water can travel before it appears inside the home.
A stain on your ceiling does not always mean the leak is directly above that spot. Water may enter near a chimney, vent, valley, or pipe boot, then move along framing before showing up in another area.
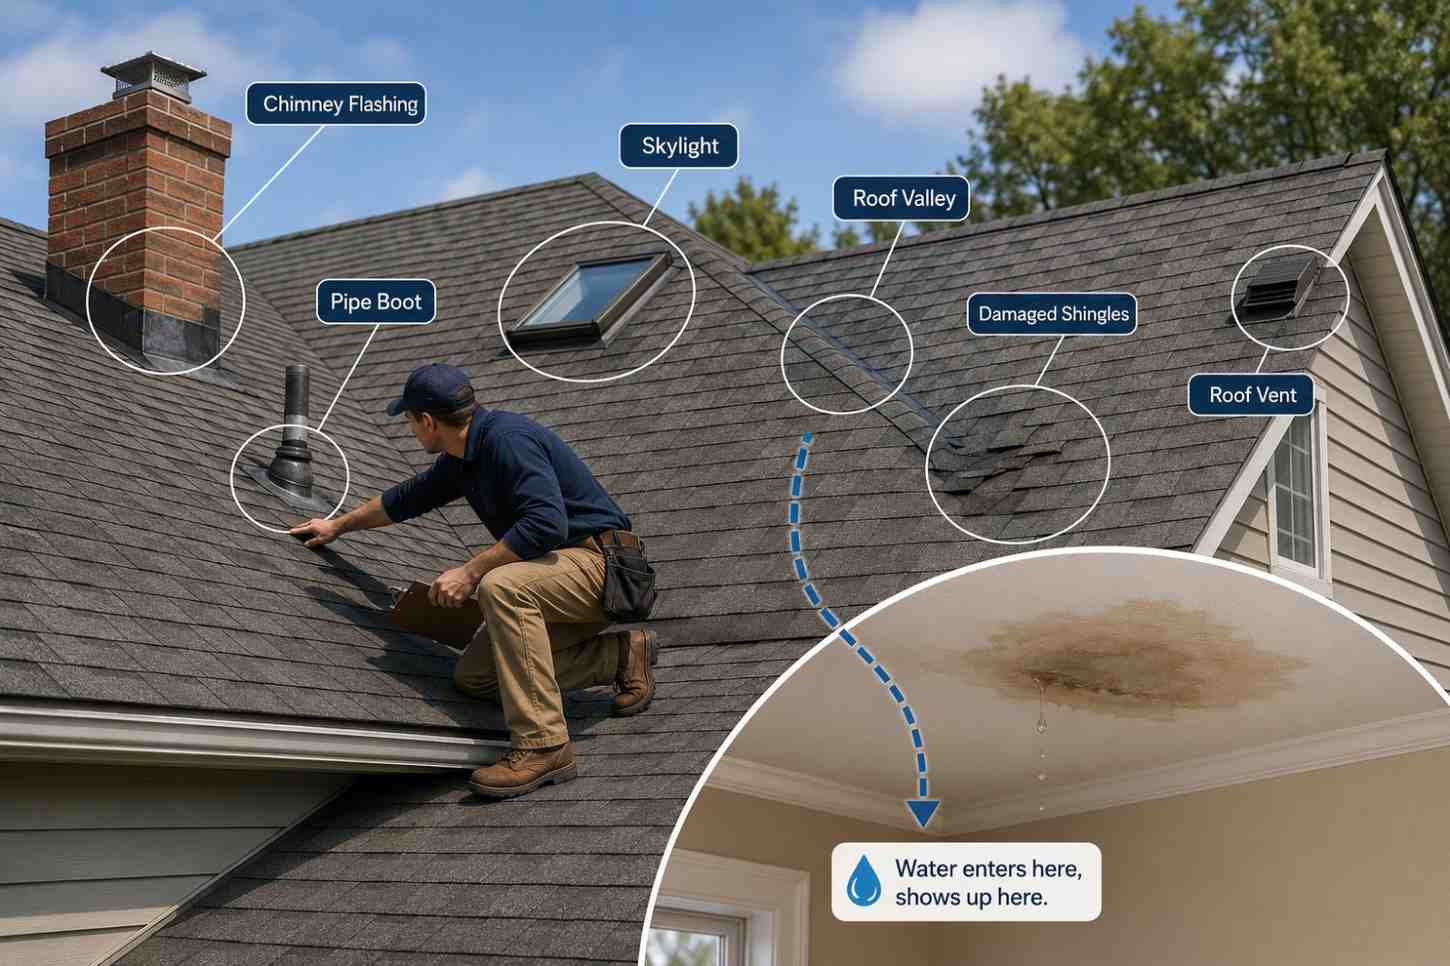
Common leak sources include:
- Chimney flashing
- Pipe boots
- Skylights
- Roof valleys
- Damaged shingles
- Roof vents
- Exposed nails
- Poorly sealed roof penetrations
The goal is not just to patch the visible problem. The goal is to find why water is getting in and fix the source correctly.
9. Photos, Documentation, and Explanation
After checking the roof, a professional roofer should explain the findings clearly. Photos are important because they allow you to see what the roofer saw.
You may receive photos of missing shingles, damaged flashing, granule loss, cracked pipe boots, storm damage, clogged gutters, or attic moisture. This makes the inspection easier to understand and helps you make a confident decision.
A trustworthy roofing company should explain:
- What damage was found
- How serious the issue is
- Whether repair is possible
- Whether replacement should be considered
- What may happen if the issue is ignored
For homeowners in Maryland and Virginia, UD Roofing provides free roof inspections with clear explanations, practical recommendations, and a focus on helping homeowners understand the real condition of their roof.
10. Repair or Replacement Recommendation
At the end of the inspection, the roofer should explain whether your roof needs a repair, maintenance, or replacement. Not every issue means you need a new roof. Small problems like missing shingles, loose flashing, or a cracked pipe boot can often be repaired.
If the roof is old, leaking in several areas, or showing widespread damage, replacement may be the better long-term option. A professional roofing contractor should explain both choices clearly so you can make the right decision for your home and budget.
How Long Does a Free Roof Inspection Take?
Most residential roof inspections take about 30 minutes to one hour, depending on the roof size, slope, condition, attic access, and whether leaks or storm damage need closer review.
A simple inspection may be quick, while a roof with multiple problem areas may take longer. The inspection should not feel rushed, because the roofer needs enough time to check key areas and explain the results clearly.
Is a Free Roof Inspection Really Free?
In many cases, yes. Roofing companies often offer a free roof inspection so homeowners can understand their roof condition before deciding on repair or replacement.
However, it is smart to ask what is included before scheduling. A standard free inspection usually includes a visual roof check, damage assessment, photos, and recommendations. More detailed reports, real estate inspection documents, certifications, or advanced moisture testing may cost extra.
Before booking, ask:
- Is the inspection completely free?
- Will I receive photos of the damage?
- Will I get a written estimate if repairs are needed?
- Do you inspect for storm damage?
- Do you check the attic if there are leak signs?
- Is there any obligation after the inspection?
A professional roofing company should answer these questions clearly.
FAQs About Free Roof Inspection
How long does a roof inspection take?
Most roof inspections take about 30 minutes to one hour. Larger roofs, steep roofs, storm damage, or leak inspections may take longer.
Is a free roof inspection really free?
In most cases, yes. Many roofing companies offer free roof inspections. However, special reports, certifications, or advanced testing may cost extra, so it is best to ask before scheduling.
Do I need a roof inspection after a storm?
Yes. A storm damage roof inspection can help find wind, hail, or impact damage that may not be visible from the ground.
Can a roof inspection find the source of a leak?
Yes. A professional roof leak inspection can help identify the source by checking shingles, flashing, vents, pipe boots, skylights, valleys, and attic signs.
Will I need a roof replacement after the inspection?
Not always. Many roof problems can be repaired. Roof replacement is usually recommended only when the roof is old, badly damaged, or leaking in multiple areas.
How often should homeowners schedule a roof inspection?
Most homeowners should consider a roof inspection once a year and after major storms. Older roofs may need to be checked more often.
Free Roof Inspection in Maryland and Virginia
Homes in Maryland and Virginia face a mix of weather conditions throughout the year. Heavy rain can expose leaks. Wind can lift shingles. Hail can damage the roof surface. Humidity can affect attic ventilation. Winter weather can also put stress on older roofing systems.
Because of these conditions, local experience matters. A roofing company that regularly works in Maryland and Virginia will understand the common signs of storm damage, moisture problems, aging shingles, and ventilation issues found in the area.
If you need a free roof inspection in Maryland or Virginia, UD Roofing can inspect your roof, explain the findings, and recommend the right next step based on your home’s actual condition.
READY TO TRANSFORM YOUR SPACE?
Discover top-rated construction, remodeling, and renovation services tailored to your needs.
Trusted by 50+ businesses across Maryland & Virginia.